

How To Install Cedar Board And Batten Siding
Like well-nigh things DIY, installing lath and batten siding is relatively like shooting fish in a barrel with the right tools, a bit of time and a flake of data and instruction.
A Bit Nigh Board And Crossbar Siding
Board and batten siding is a terrific exterior siding system. It looks good and is easy to install and maintain, and it'due south relatively low price and very durable.
Lath and batten siding is thought to have originated in Kingdom of norway and Sweden, where information technology was used to protect the exterior of log buildings. The technique was brought to the Us in the mid to late 1800s becoming pop on homes and barns in the Western United states of america.
Today, lath and batten siding has regained popularity in the United States practise in function to the rising of retro-mod style architecture.
So, what is lath and batten siding? Board and batten is a fairly elementary exterior siding system of gaped wide vertical boards with overlying vertical battens covering the gaps betwixt the boards. The technique is time-tested and durable, as the arrangement allows for the natural expansion and wrinkle of the siding textile.
While traditional lath and batten siding uses wide boards and narrow overlying battens, in that location are a few installation variations.
Reverse board and batten or batten and lath, installs wide boards on top of narrow battens. Lath on board, similar it sounds, installs boards over boards in alternating fashion.
These culling installation techniques are mainly used to provide unlike visual patterns, but add together complexity of installation and fastening patterns and probably are less desirable for DIY projects.
Traditional board and batten mode is probably the simplest to install and likely the most durable of the various lath and crossbar install styles.
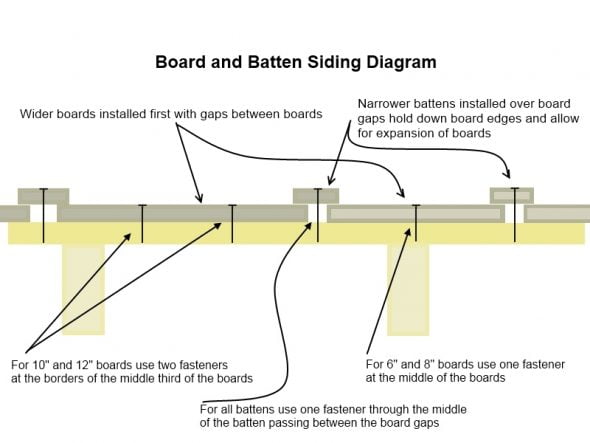
To install board and batten siding in the traditional fashion, merely install wide boards, gapped i board width apart and cover the gaps between the wide boards with narrow battens installed over the board gaps, overlapping the board edges to hold down the boards and comprehend the gaps.
When installed properly, this traditional board and batten install technique secures siding boards while still allowing them to expand and contract without splitting or bowing.
The wide boards are fastened at the centers, avoiding edge fasteners and allowing the board edges to expand and contract. The overlying battens are also fastened at their centers with passed fasteners too avoiding the underlying lath edges, passing but through the gaps. The attached overlying battens tin can then hold the board edges apartment while still allowing expansion and wrinkle of the underlying boards.
This unproblematic fastening system creates a sound, dynamic exterior wall that holds upward to big climate changes and temperature swings.
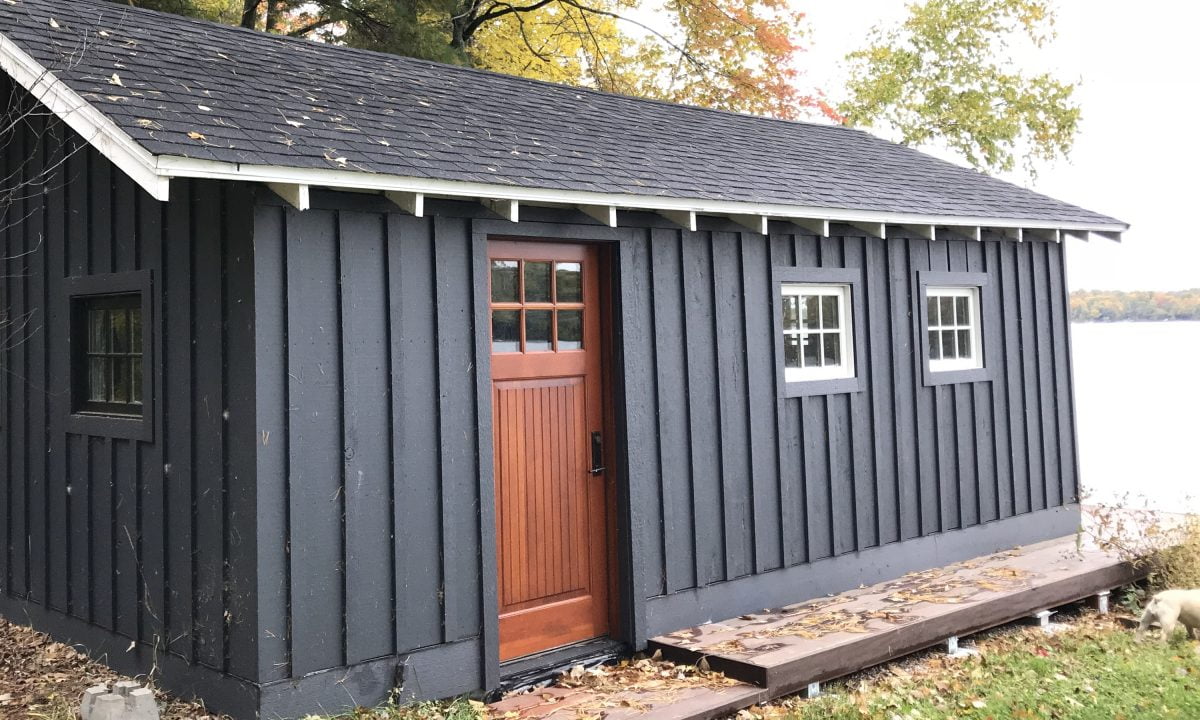
This traditional method of board and batten installation is the method nosotros used for our cabin install.
How To Install Board and Batten Siding
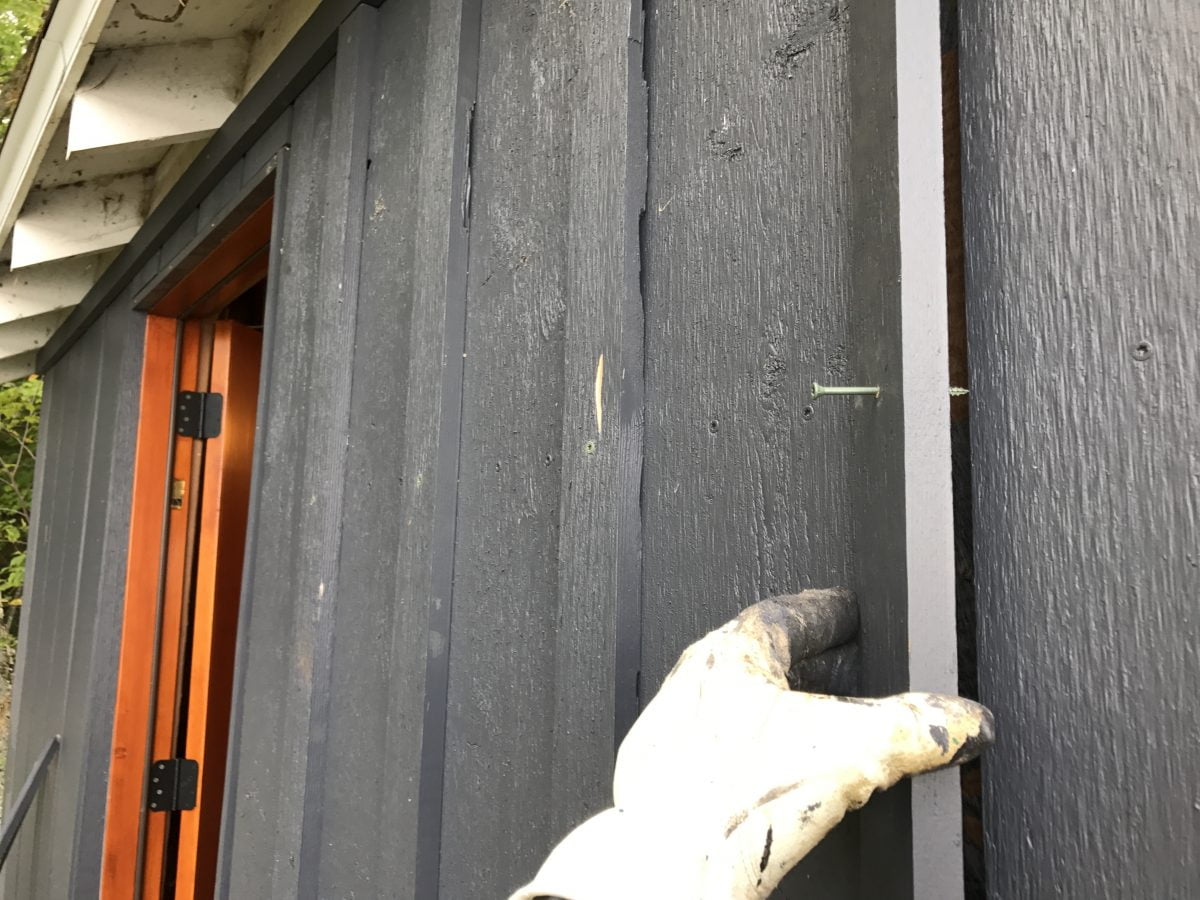
To install board and batten siding, offset install wide vertical boards, spaced approximately 1 lath width (7/8″) apart. Secure these boards using fasteners fasteners placed at the eye of the siding boards. Centering the fasteners allows the boards to expand and contract without bowing or splitting (see diagram below).
After the boards are installed, cover the gaps between the boards with narrow battens. Secure the battens with centered fasteners passed through the gaps between the boards without passing through the boards.
Installed correctly, the battens cover the gaps between the boards and hold downwardly their edges without restricting the boards movements under the battens. This technique allows the boards to freely expand and contract with humidity and temperature changes without cracking.
Board and crossbar siding fastening diagrammed:
The Nitty Gritty of Lath and Batten Siding
Installing board and crossbar siding, similar any vertical siding, presents the challenges of fastening vertical siding boards to vertically framed stud walls.
Boards installed up and down (vertically) do not regularly intersect stud framing members like horizontally installed boards do. This issue was traditionally solved by adding horizontal framing pieces between studs called blocking, then attaching the vertical to the installed blocking.
While this method works, installing blocking is a lot of work and may be impractical for remodeling. Blocking likewise reduces the infinite in the wall crenel for insulation and tin go far difficult to run wires and plumbing in the walls.
Alternatively, y'all can spike vertical siding boards directly to the wall sheathing you are using. This method relies on using screws driven into sufficiently thick wooden wall sheathing, i.e. 1/2″ or thicker plywood or 23/32″ of thicker OSB (oriented strand board).
If using nails to spike your siding and you would similar to blast directly into the sheathing, you will need a wood sheathing material of at least one i/four″ thick (like sold pine boards or 2 layers of plywood).
The existing original sheathing on our motel was a dense cellulose fiberboard, limiting my options to removing the fiberboard and installing either horizontal blocking or sufficiently thick plywood or OSB sheathing.
I chose to remove the fiberboard and install 3/4″ plywood capsule. The thicker plywood sheathing allowed me to spike the board and batten siding direct to the plywood sheathing with screws and the plywood provided a large structural upgrade for my walls.
Oriented Strand Board (aka OSB) could likewise be used as the sheathing under the lath and batten siding, merely OSB has some limitations compared to plywood. OSB tends to take lower fastener holding strength compared to plywood, and doesn't handle h2o and moisture equally plywood.
By swapping the sometime fiberboard for three/4″ plywood, I was able to install the board and batten siding using deck screws. I no longer had to worry about hitting the framing studs with the fasteners. If using this technique of screwing directly into the exterior wall sheathing, be sure to using thick enough plywood or OSB.
Fastener Details for Board and Batten Siding Install
| Nails | Screws | |
| fasten into | at least ane 1/4″ solid woods (studs) | at least one/2″ plywood or 23/32″ OSB |
| fastener grade | exterior grade – stainless, coated or galvanized | exterior grade – stainless, coated or galvanized |
| fastener style | siding: screw or band shank | apartment head coarse thread |
| fastener length (boards) | siding thickness + 1 1/two″ | siding thickness + 3/four″ |
| fastener length (battens) | batten + siding thickness + 1 1/2″ | batten + siding thickness + 3/four″ |
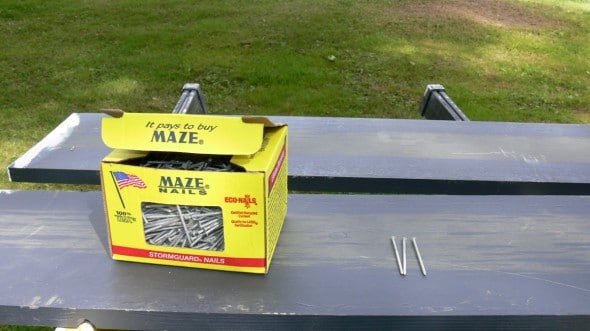
If using nails to spike your siding, no matter what you plan to nail them into, employ exterior-form nails designed specifically for installing the woods siding, like exterior-grade ring-shank or screw shank manner nails for siding.
Nails should also be compatible with the specific wood species you are using. Some woods will react with certain fasteners causing discoloration at the fastener site. Stainless steel or hot-dipped galvanized nails are typically the best choices.
Many siding nails will have specially designed tips to help prevent the splitting of the siding. Nails will need to be long enough to pass through the siding and into a solid wood substrate at least 1 1/four″.
Typical nails for one-inch thick siding are 2 ane/two″ long and iii to 3 one/2″ long for battens. Remember to add length for whatever material (similar furring strips or rain screen mat) between the siding and capsule.
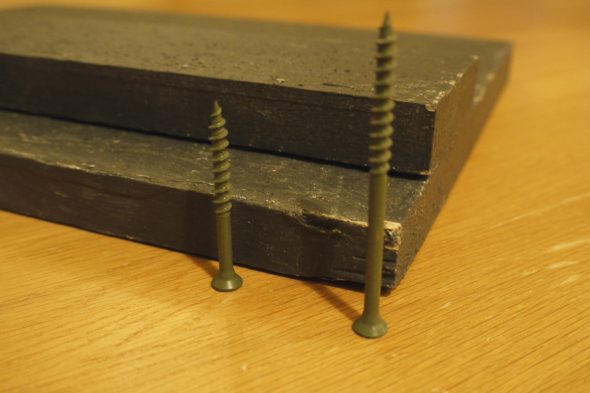
If you utilise screws every bit I did, look for an outside grade screw (stainless or coated) compatible with the forest species you will exist using. Nearly deck screws will work well. I used the greenish colored DeckMate screws I purchased locally from the Habitation Depot.
Screws demand to be long plenty to laissez passer through the siding and into a suitable (solid wood, plywood or OSB) sheathing substrate of sufficient thickness. If using screws, the screws should penetrate ane/iv″ or more through the sheathing. Fastener lengths can be calculated past calculation the thickness of the siding boards and sheathing + ane/iv″ plus the thickness of any material (pelting screen membrane or furring strips) between the siding and the sheathing.
For my projection, I added the post-obit materials to decide my screw lengths:
- 7/viii″ thick siding material (ane″ material)
- i/4″ rain screen membrane (under siding airspace membrane)
- iii/4″ plywood sheathing
- 1/4″ fastener penetration depth through the sheathing
- 2 1/8″ thickness full for boards (single siding board) and 3″ for battens (double siding board thickness)
Afterwards adding the above, the recommended length of fasteners for the boards (first siding layer) was 2 ane/8″ and 3″ for the battens which are stacked on top of the boards. Because the screws would be simply slightly countersunk, I settled on 2″ screws for the two i/8″ fastener length for the boards and iii″ for the battens.
Screw Length and Size for My Lath and Batten Siding Install
Siding boards: DeckMate 2″ #8 Star scrap flat-head deck screws
Batten boards: DeckMate three″ #9 Star bit flat-head deck screws
If you are planning on using nails, they should exist marked as for siding and either hot-dipped galvanized steel or stainless steel.
Choosing a Fabric for Your Board and Batten Siding
Lath and crossbar siding can be constructed from a variety of materials. Forest, engineered woods products, fiber cement boards, and polymer (vinyl) products are all suitable materials for board and batten siding. Of these, fiber cement boards and natural wood boards are excellent choices, and both take advantages and disadvantages.
Fiber cement board products (HardiePanel, etc.) accept the advantages of concrete; low maintenance, long life, dimensional stability and moisture, and burn down resistance.
Natural wood boards have the advantages of forest; natural dazzler, the ability to take a stain, improved audio and thermal insulation and ease of cutting and installation.
Cement lath products also have the disadvantages of concrete; heavyweight, difficult to cut and install, silica dust formation when cutting, and an artificial look.
Wood products accept the disadvantages of wood; dimensional instability, tenancy to crack or separate, demand for repeat staining, susceptibility to woodpeckers, insects, and rot, and the lack of burn resistance.
I chose natural cedar for my board and batten siding. The natural dazzler of wood and the durability of cedar fabricated information technology an easy choice for me. Unfortunately, the contempo increases in the price of natural cedar may brand this material price-prohibitive to use. Other locally milled wood species may be more toll-friendly compared to cedar.
No thing the type of woods you choose, all-natural wood products are susceptible to moisture and rot. While several species of wood accept naturally enhanced protection against moisture and disuse, all will do good from the protection of an applied stain or paint.
If you plan to paint or stain your siding, consider finishing all six sides (front end, dorsum, and both ends) prior to installing them. Finishing simply the exposed surfaces of installed siding allows moisture into the unfinished surfaces of the boards. This tin can lead to paint or stain durability problems and warping, neat and twisting of the siding boards and battens.
In addition, if you plan to use a solid colour stain or paint, a base primer glaze may exist beneficial. Some paints and stains perform well without a primer, but fifty-fifty with these products, most will benefit from more than one coat of stop and/or starting with a primer coat.
Properly applied finishes have fourth dimension. Applying a coat or two of primer, allowing information technology to dry and then applying a coat or two of stop is a long process. Not only is this time-consuming, but the quality of the finish is very dependent on the conditions, tools, products, and process used to apply any primer or terminate.
One excellent alternative to finishing your siding fabric yourself, it to buy the siding materials prefinished.
Aye, information technology will probably toll more, just for many, the time saved and the quality of the terminate is worth the boosted cost. I found the price of ordering prefinished fairly competitive with the cost of what I could get the unfinished woods for locally. My cost for ane″ x 10″ knotty western red cedar in mixed 8′ and 16′ lengths was less than $2.50 / lineal ft (this was tardily 2022, long before our trade issues with Canada)!
I haven't priced prefinished cloth lately, but even if information technology is priced a buck or so a foot more than, the convenience and quality benefits may be well worth the additional cost. And, its hard to overstate just how awesome it is to receive a shipment of factory finished wood fix to install.
Ordering prefinished fabric saves a ton of time, and the siding is sealed with a professionally applied, factory-controlled stop. You still should prime and paint field cut ends, simply that's like shooting fish in a barrel.
The supplier I ordered from also recommends a field glaze of finish over the exposed surfaces after the product is installed. Once more, a fairly like shooting fish in a barrel step – peculiarly when compared to painting crude cedar from scratch. The field coat of terminate also seals your fasteners, enhancing the immovability of the siding.
For my project, I ordered prefinished cedar boards from Cedar Shingles Directly of Wyoming, Michigan. Their factory applies a Cabot finish of your pick – for us, a latex solid stain applied over a solvent-based primer. The product was shipped via semi-trailer truck and arrived well packed, undamaged and ready to install. The quality of the finish on the wood was exceptional. I highly recommend them.
Consider Best-Practice and Add a Vented Rainscreen Air Space Nether Your New Siding
Prior to installing your siding, consider upgrading your exterior wall assembly to a rainscreen-style wall past calculation a vented air infinite (too referred to equally an "air chamber") to the exterior wall build. A rainscreen is a organization of wall building to help control moisture within the wall assembly.
Rainscreen walls separate the weather condition-resistant bulwark (house wrap, cobblestone felt, etc.) from the siding boards allowing the wall assembly to "breathe", helping prevent moisture damage and mold within your exterior walls. The rainscreen wall aims to address moisture problems all to mutual with modern air-tight structure materials and techniques.
Traditional exterior wall structure, known every bit "redundant barrier" structure, relies on a sealed siding material and a second, "redundant" water bulwark (frequently asphalt felt, a.k.a "tar paper") directly nether the siding. This style of wall construction worked well with older, more air-permeable home construction and was typical of residential structure for most of the last century.
Unfortunately, redundant barrier techniques with newer synthetic house wraps and "airtight" structure is decumbent to water trapping which can lead to rot and mold issues. In reality, all outside walls will eventually leak, and the rainscreen wall provides a style for them to dry when they do get wet.
Building Walls That Dry – Rainscreen Walls
Rainscreen wall structure originated in Norway every bit a method to protect exterior walls from driving rains. Walls constructed in this way non only protect the inner wall from the weather but are designed to dry out out in one case wet.
Vented pelting screen walls allow any penetrated water to drain downward and out of the wall and air to freely catamenia up the rainscreen wall crenel, helping dry out the wall assembly. The air space also provides a force per unit area and capillary break inside the wall, interrupting water as it attempts to move through the wall.
Building a rain screen wall system requires a bit of additional work when compared to traditional techniques, but the reward is a long-lasting, healthy exterior wall. We have had our rainscreen board and crossbar siding for nearly x years and it looks brand new.
To construct a vented rain screen wall, add together a vented air infinite betwixt the redundant barrier – that is the weather-resistant barrier (WRB) and siding. Run across the layers below:
Redundant Barrier Wall Layers vs. Pelting Screen Wall Layers
TRADITIONAL WALL: framing | sheathing | conditions-resistant barrier | siding
RAINSCREEN WALL: framing | sheathing | atmospheric condition-resistant barrier | vented air space | siding
The air space in a pelting screen wall system is the key to the pelting screen wall. This air space within the pelting screen wall can be created past a variety of methods:
- furring strips
- rain screen spacer mats
- textured firm wraps
1. Furring strips are thin strips of wood or other material that are installed vertically to lift the siding off the weather-proof barrier covered capsule. Furring strips can be created using 1/4″ or thicker material cut from the capsule, or other, or you lot tin can utilize one of the many manufactured products. Furring strips piece of work well with horizontally installed siding (and therefore non well with board and batten siding). Some manufacturers create a vented furring strip intended to be installed horizontally, allowing for easy use with vertical siding.
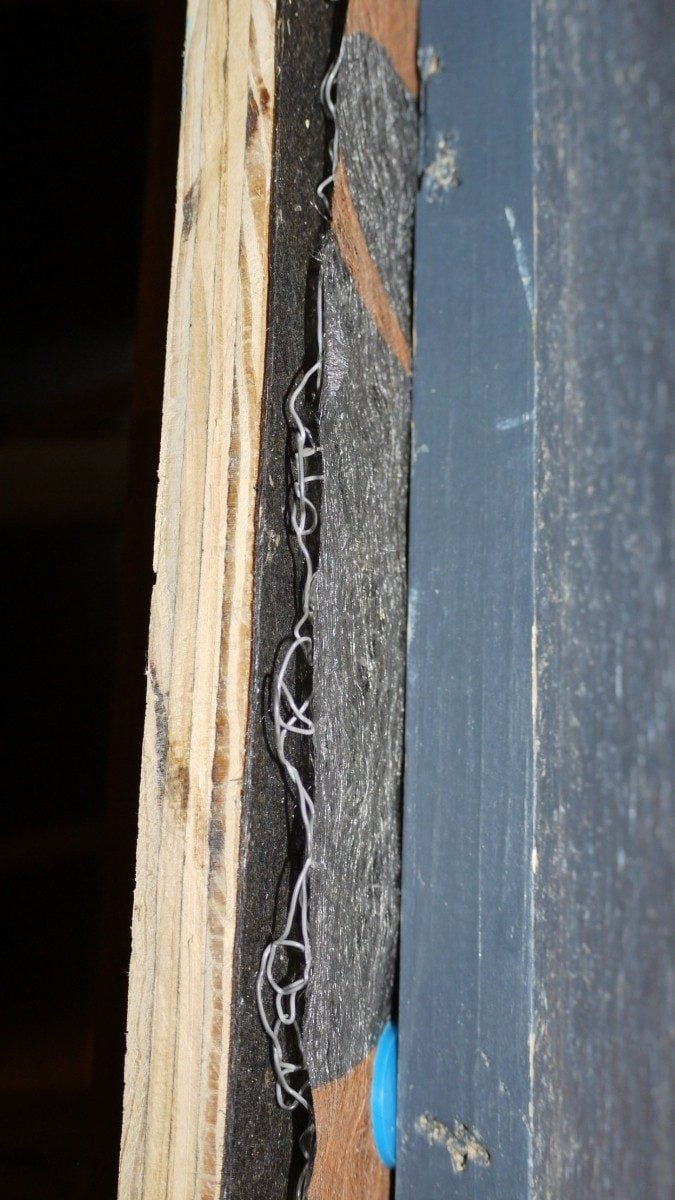
ii. Rainscreen spacer mats provide some other method of creating a vented airspace. These thick, permeable mats are installed over the WRB and create an air-infinite nether the siding material.
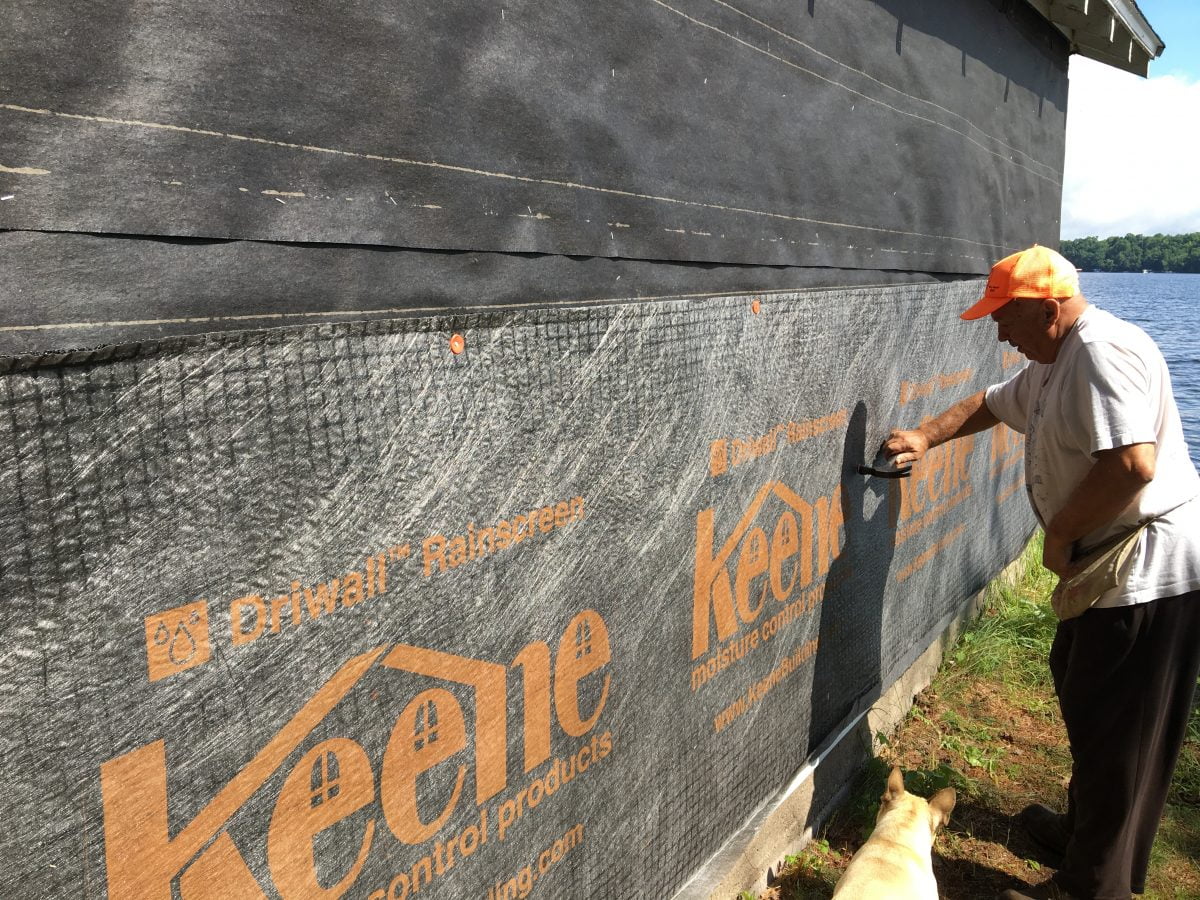
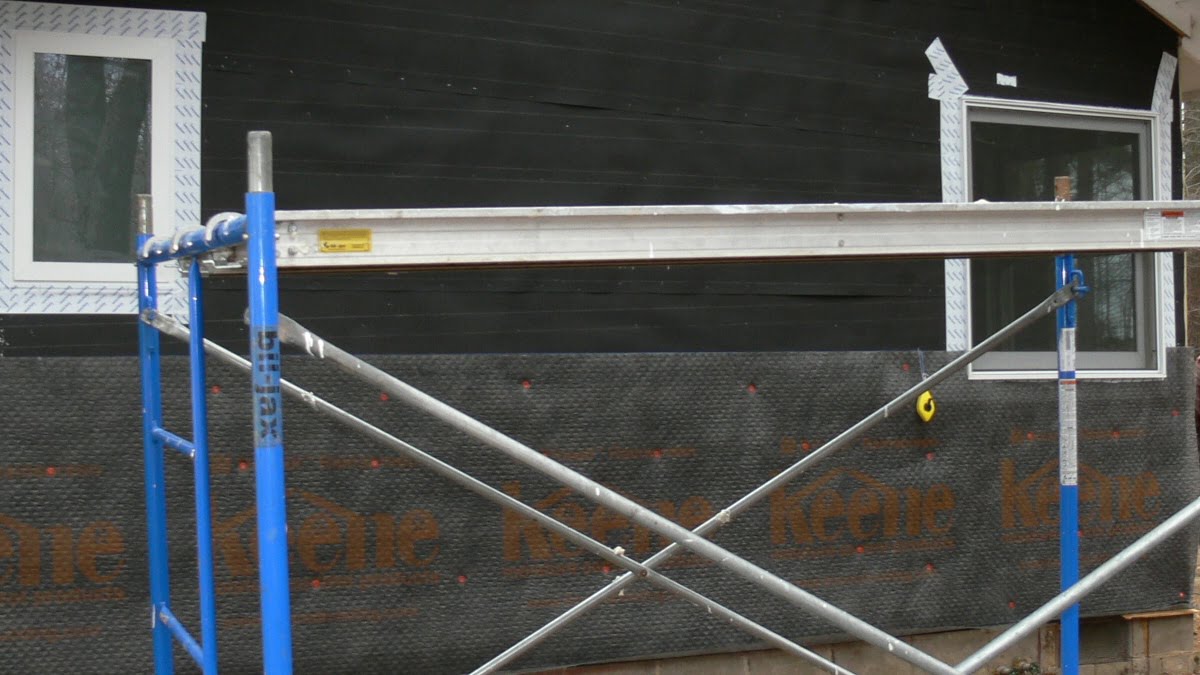
I used a spacer mat product by Keene called Driwall Rainscreen 020-1 for this project. The Keene product provides a ane/4″ airspace and is installed on elevation of your weather condition-resistant barrier under the siding.
In improver to helping to keep walls dry out, rain screen wall structure can help protect your weather condition-resistant barrier (WRB). Many weather-resistant barriers dethrone afterward exposure to certain tannins and wood extracts. Separating the WRB from the siding boards via a pelting-screen wall pattern may help limit contact of the two.
3. Textured or Wrinkled Firm Wraps. Certain specialty firm wraps are as well marketed to serve as an all-in-one WRB and air space mat. These are typically house wraps with a textured or raised surface to create a slight gap betwixt the wrap and the overlying siding. These product can work, but commonly don't provide the same air infinite as furring strips or dedicated rainscreen mats.
A summary of the layers I used to build my outside wall (from inside to out):
- ii×4 studs 16″ oc
- R-13 Fiberglass batt insulation
- 3/4 Plywood (CDX exposure 1)
- 30# builders felt (covering felt)
- Driwall Rainscreen mat past Keene
- Cedar board and batten siding
If yous are interested in reading more than about the details of building a vented rain screen outside wall please encounter my article "How and Why to Build a Rainscreen Wall".
Plan for the Install of Your New Board and Crossbar Siding
Once yous accept settled on the details of your wall reconstruction and installed the conditions-resistant barrier and optional vented air space, the last task is to install the siding boards.
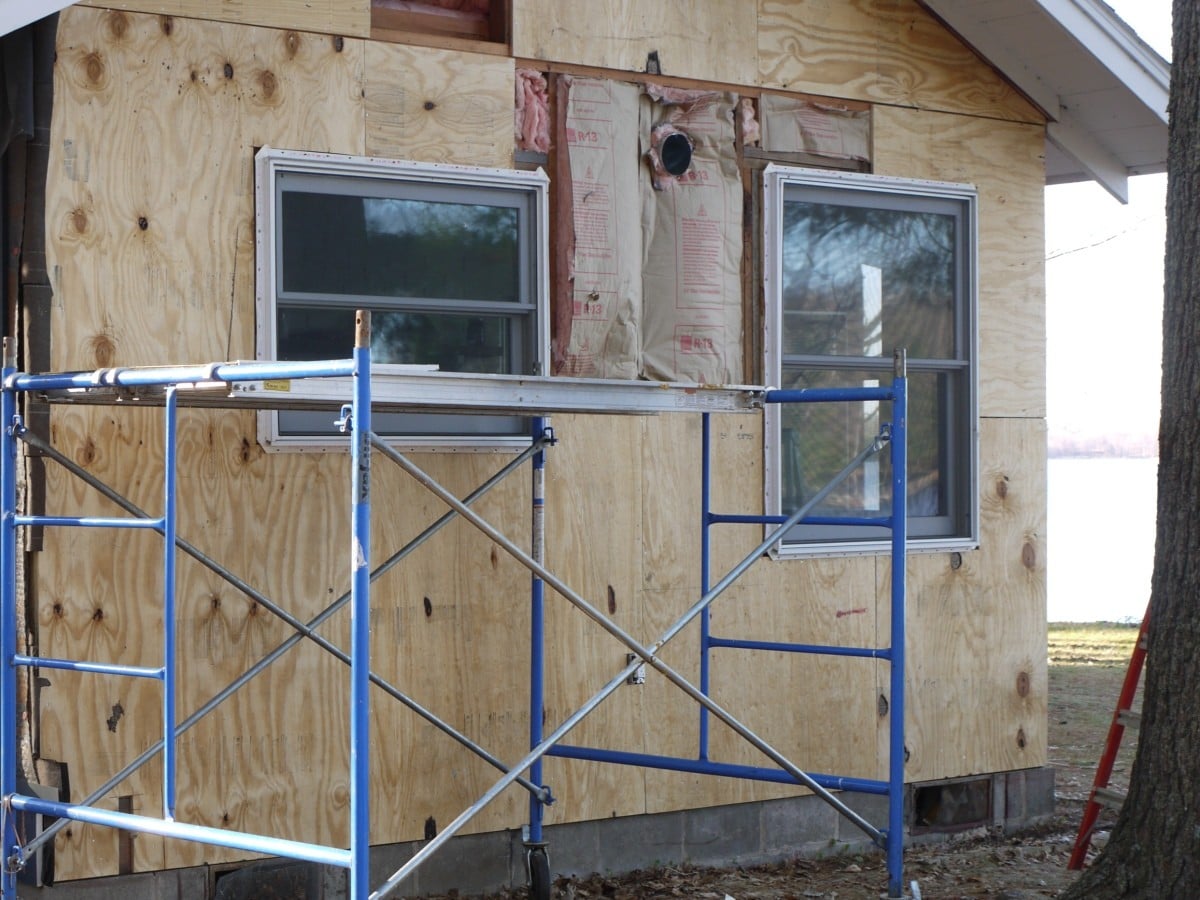
To install your siding, y'all volition need sufficient admission to your walls. Ladders work, just scaffolding may work better. If yous can, borrow, rent or buy some scaffolding for the project. Scaffolding will give you lot a stable platform to work from that is by and large safer than ladders or ladders with planks.
In add-on to cloth and ladders or scaffolding, you will need to get together all the necessary tools and organize your piece of work site. For my project, I constitute information technology all-time to set upwardly a few specific stations for private tasks. Although you can install siding past yourself, as I did, a helper is corking.
To organize my work site, I had made one station for measuring, and cutting the boards, and another station for mark and starting the fasteners – I preinstalled the screws before putting the siding boards on the wall. I found having several minor areas for each task immune me to keep my tools organized and my workflow efficient.
As for your siding fabric, program ahead. If using woods, your stock should have time to acclimatize to your job site. And, as discussed above, I highly recommend having your siding textile painted or stained prior to putting them up.
For most of my material, information technology was already primed and stained every bit I ordered it factory finished (I highly recommend doing this!). I did, notwithstanding, need some additional material that I had to prime and end myself. I used the weekends prior to the kickoff of the install to prime, finish and let finished boards to dry out.
Then, with the material finished and ready to install, I simply prime sealed the cut ends prior to installation. After the boards had been installed, I finished the unabridged surface with a final field glaze of finish.
Read on for the step-by-step of my lath and crossbar siding install.

Source: https://cabindiy.com/how-to/board-and-batten-siding/
Posted by: parentfactiven.blogspot.com
0 Response to "How To Install Cedar Board And Batten Siding"
Post a Comment