

How Hard Is It To Install A Hot Water Heater
DIY H2o Heater Installation
When your water heater begins to leak, you lot have to install a new one fast.
![]() Time
Time
A full 24-hour interval
![]() Complexity
Complexity
Intermediate
![]() Cost
Cost
$101–250
Introduction
When your water heater begins to leak, y'all have to replace information technology fast. Nosotros'll bear witness yous how to install your own gas h2o heater in less than a day. Even if you don't need a new h2o heater right at present, chances are you volition within the side by side few years. Water heaters tend to concluding seven to 15 years. If yours is getting old, this article is besides for you. Replacing a water heater isn't difficult if you're handy with basic tools and accept a bit of experience soldering copper.
Tools Required
Materials Required
- Discharge pipe
- Fittings
- Pipe thread compound
- Pressure relief valve
- Solder
- Venting pipe and connectors
- H2o and gas piping
Getting Started Installing Your New Hot H2o Tank
We're replacing a natural gas water heater in our demonstration. The steps for replacing a propane water heater are exactly the aforementioned, and those for an electrical water heater are similar.
In any case, when y'all're planning a water heater replacement, play it safe. Call your local department of inspections and ask if you need a allow. And brand sure a plumbing or electrical inspector checks your work.
Installation Costs and Labor
Plumbers typically charge $45 to $65 an 60 minutes and tin can usually install a water heater in a day or in six-eight hours.
Most residential water heaters cost $150 to $400 for either gas or electric, plus $200 to $450 if you lot have a plumber install it. More expensive gas h2o heaters with special venting systems also are available. Only they're more difficult to install, and we won't bargain with them here.
H2o Heater Parts and Breakup
- Flue pipe
- Cold water shutoff valve
- Draft diverter
- Temperature and pressure relief valve
- Overflow pipage
- Hot h2o outlet
- Anticorrosion Anode Rod
- Dip tube
- Elements
- Insulation
- Drain valve
- Thermostat or control valve
- Burner
- Thermocouple
- Gas supply valve
When to get a new water heater
Your water heater is dead when the tank leaks. The telltale sign that your water heater needs replacing is a wearisome drip underneath, usually showing upwards as a trail of rusty water. This means that the steel tank has rusted through and can't be fixed. Other symptoms, such every bit insufficient or no hot water, usually signal other water heater repair bug that you can fix.
If you lot spot a drip, program to replace the water heater right away. Don't wait until the leak gets bad.
New water heaters come with installation instructions and lots of warnings to make sure you handle the gas, electric and other connections safely. In this commodity, nosotros'll supplement those basics with techniques and "real world" advice from several professional plumbers.
But take heed: You'll be working with natural gas, propane or electricity, all of which are hazardous. If you don't feel confident, call in a pro to take care of the tough parts. And have your work inspected when it's done.
Plumbing codes vary by region. Describe your planned installation to your local plumbing inspector, including the types of materials you lot intend to use for your new connections. Better to get guidance first so you don't accept to change things later!
Figure A: Gas H2o Heater Details
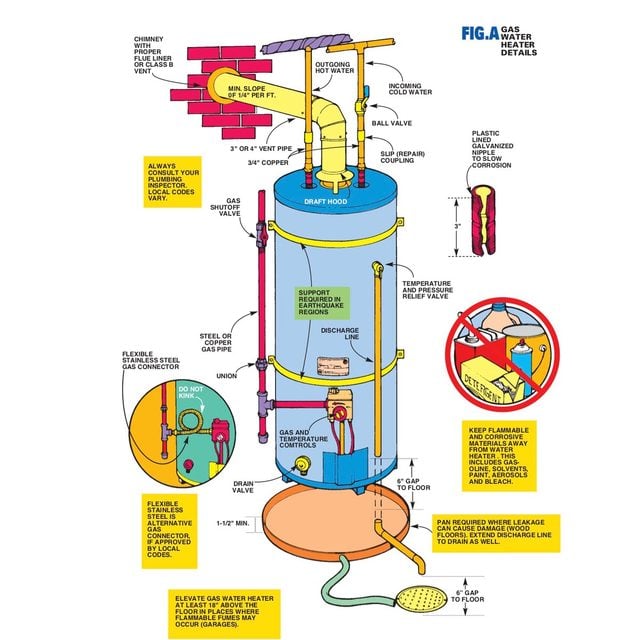
To print out this image, run into the Additional Info at the end of this article.
Figure B: Connections for Steel and Plastic Pipage

Many homes have galvanized steel or plastic (CPVC) water supply pipes. Galvanized steel pipes are difficult to replace. Nosotros recommend that y'all remove the pipes back to the nearest tee, screw on a plastic-lined galvanized nipple and complete the connections with copper as shown in our photo serial.
Because of potential estrus buildup, keep plastic piping at least half dozen in. abroad from the vent and tank. Make a transition from plastic to copper with a special coupling that's bachelor wherever CPVC is sold.
Flexible copper connectors are easier to install than solid copper, especially when the existing pipes and the tank inlets don't line up. Just not all local codes permit them. If yours does, take special care not to pinch or kink them. You could go a leak.
Projection stride-by-step (12)
Step 1
Shut off the gas and water

Plow off the gas to the h2o heater by turning the nearby shutoff valve a quarter turn. When off, the handle should be at a right angle to the pipe. Shut off the main water supply also and drain the lines past opening a faucet on the lowest floor.
Stride 2
Drain the water in the tank
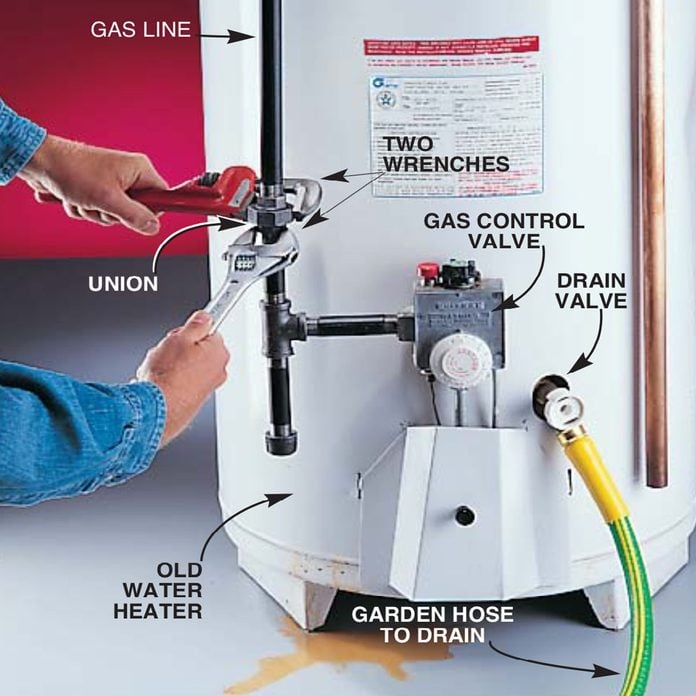
Attach a garden hose to the drain valve and bleed the water left in the tank. Circumspection: The water will exist scalding hot! Disconnect the gas line at the nearby union with a pair of wrenches and unscrew the pipage from the gas control valve with a pipe wrench.
![]()
Pace 3
Cutting off the h2o lines
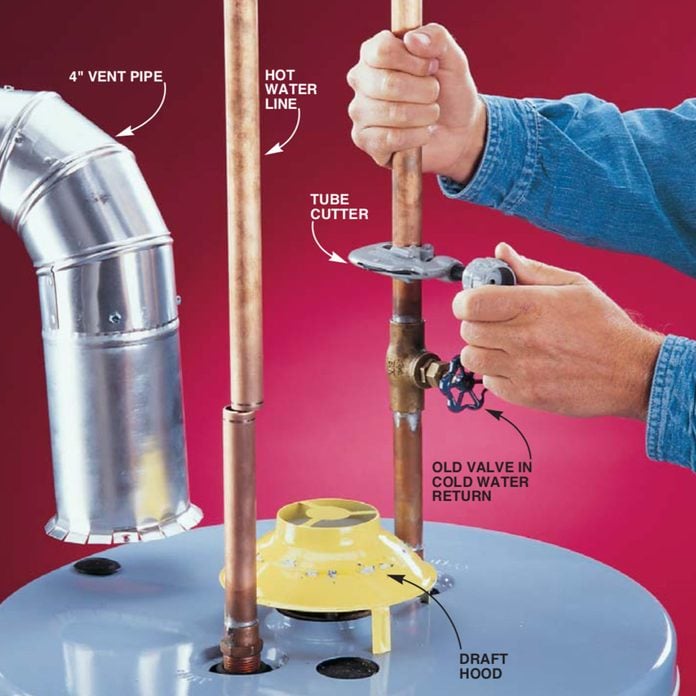
Unscrew the vent pipe from the vent hood and move it to the side. Then cut the hot and cold water lines with a tube cutter. (Unscrew unions for galvanized pipe or the nuts on flexible connectors if you have them.) Slide the onetime water heater out of the way.
Pace iv
Attach the relief valve
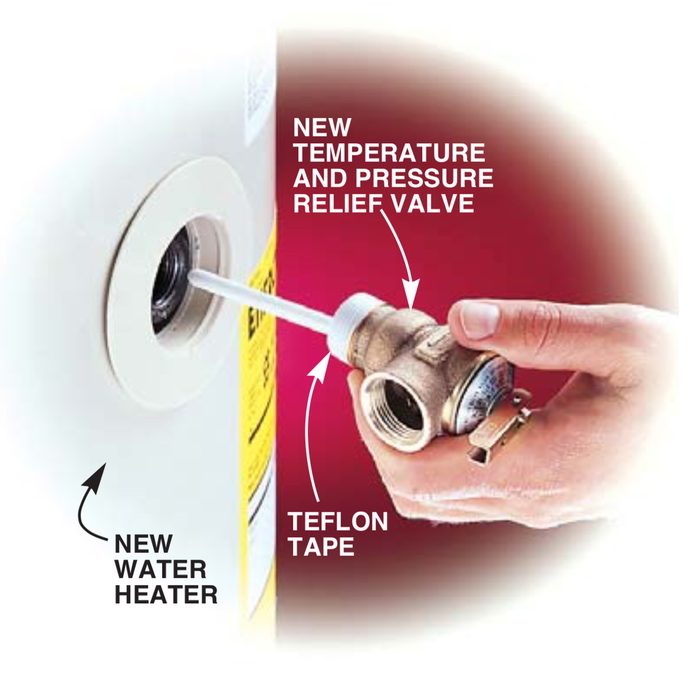
Wrap the threads of the new temperature and pressure level relief valve with Teflon tape (three turns). Spiral it tightly into the tank with a pipage wrench. Attach a copper discharge pipe (run into Fig. A for routing details).
Step 5
Attach pipe assemblies
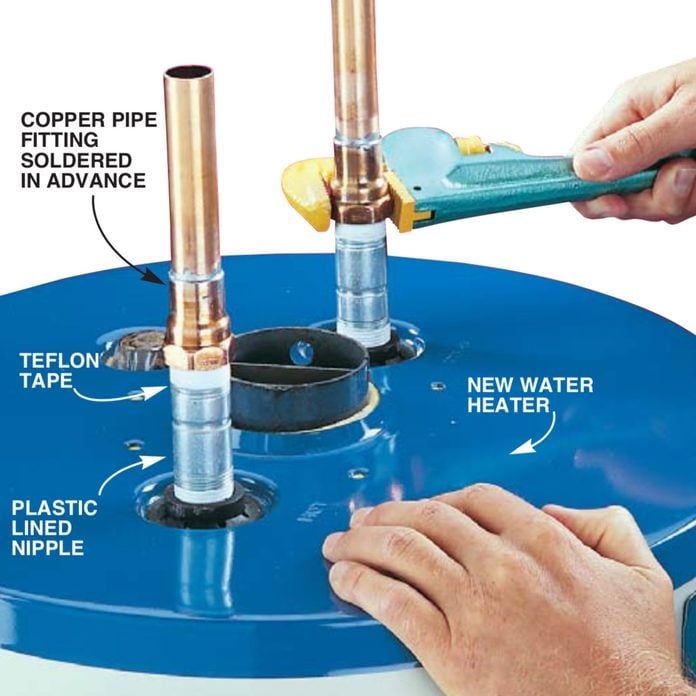
Solder new copper adapters to 6-in. lengths of iii/four-in. copper and screw the assemblies into the hot water outlet and common cold h2o inlet ports in the peak of the tank. Add short, plastic lined nipples to shield confronting galvanic corrosion, especially if you have hard h2o or if they're required by local codes.
Step 6
Adhere the h2o lines
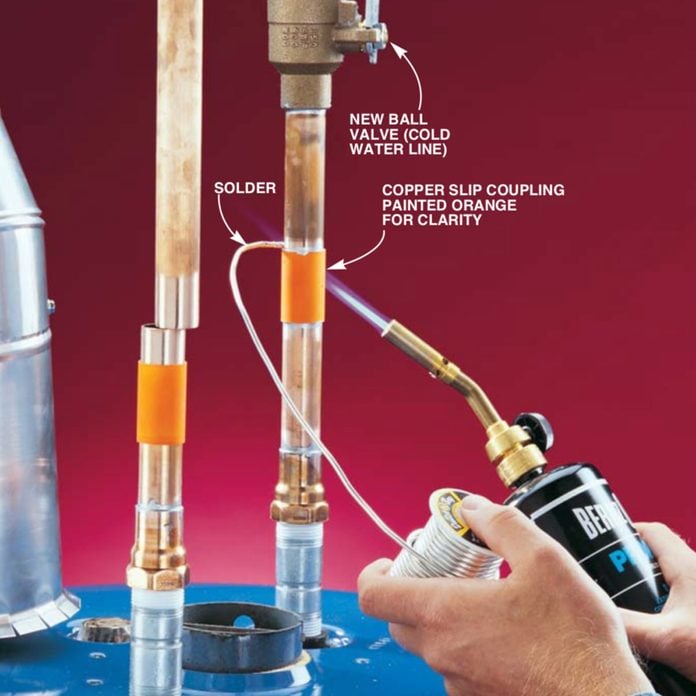
Slide the new water heater into place, recut or extend the old tubing to meet the new, and solder the tubing together using copper slip couplings. If the tubing doesn't line up, commencement the lines as needed with pairs of 45-caste elbows.
Step 7
Reattach the vent
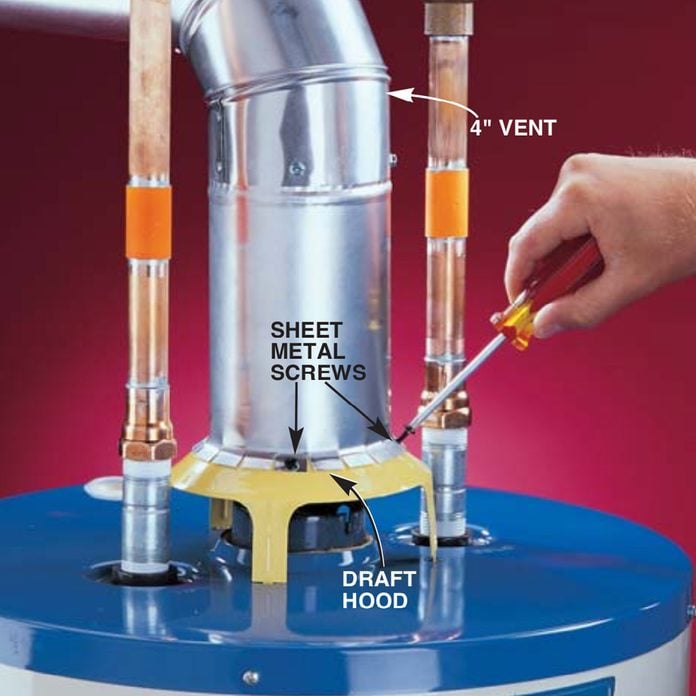
Reconnect the vent. Shove information technology tightly over the typhoon hood and anchor it with 3 3/viii-in. No. 6 sheet metal screws. Predrill the holes. The vent should rise at to the lowest degree 12 in. vertically before turning at the first elbow.
Footstep eight
Apply 2 wrenches to adhere the gas line
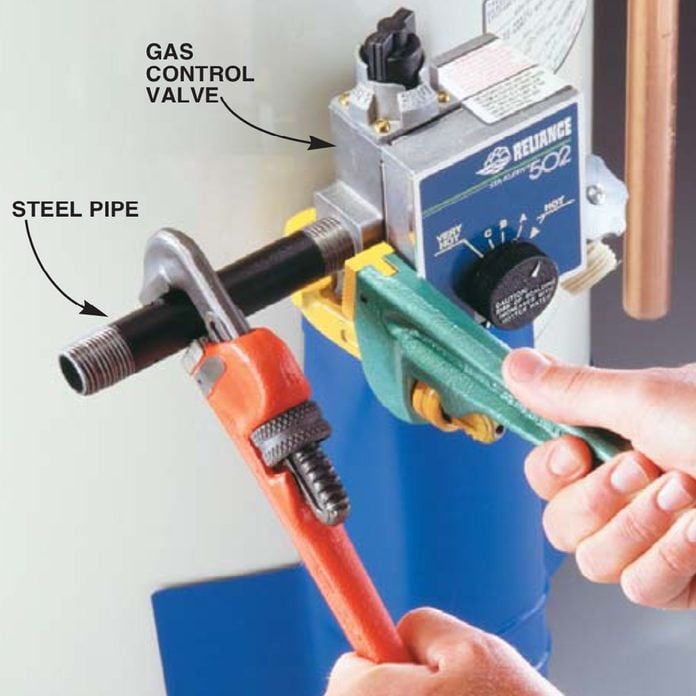
Reconnect the gas line. Glaze the threaded ends with pipe joint compound and spiral the commencement nipple into the gas valve. Use two piping wrenches to avoid stressing the valve. Reassemble the remaining nipples, finishing up with the union (Photo ii). Then follow these four steps to fill the tank: (1) Shut the bleed valve; (2) turn the water dorsum on at the principal shutoff and open the common cold h2o valve to the water heater (leave it open); (3) turn on a nearby hot water faucet until water comes out; and (four) inspect all the joints and fittings for water leaks.
Step 9
Check for backdrafting
Nigh h2o heaters rely on a natural draft to draw combustion fumes up the flue. If the draft doesn't work, those fumes, possibly containing mortiferous carbon monoxide, will spill out into your dwelling. After completing your installation, bank check the draft.
Shut all exterior doors and windows and plow on your kitchen and bathroom frazzle fans. Then open a nearby hot water faucet until you hear the gas burner in the water heater ignite. After a minute, move a smoking friction match around the edge of the typhoon hood (Photo 7) on top of the heater. The smoke should exist drawn up the vent pipe. If the fume doesn't draw, the fumes from the burner aren't venting. Plow off the gas to the water heater and telephone call a licensed plumber to correct the problem.
Step x
Check for leaks
Await for bubbles at connections
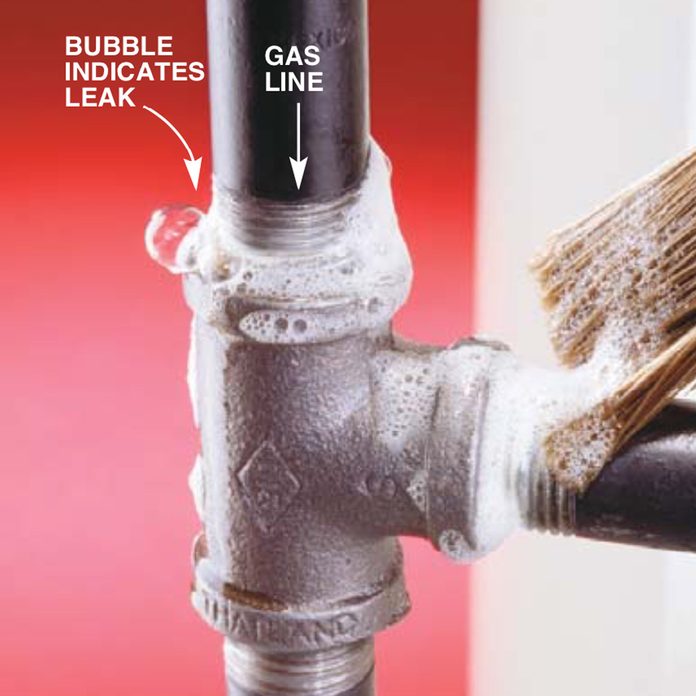
Turn on the gas and check connections for leaks by brushing a l-50 mixture of dishwashing liquid and water over the joints. If the mixture bubbles, you have a leak. Tighten or reconnect joints that leak. Wipe the joints dry when finished. Phone call the plumbing inspector to bank check over your piece of work. Follow the how-to advice that accompanies the photos to make sure the connections are tight.
Step 11
Light the pilot lite
Use a lighter to light the airplane pilot light
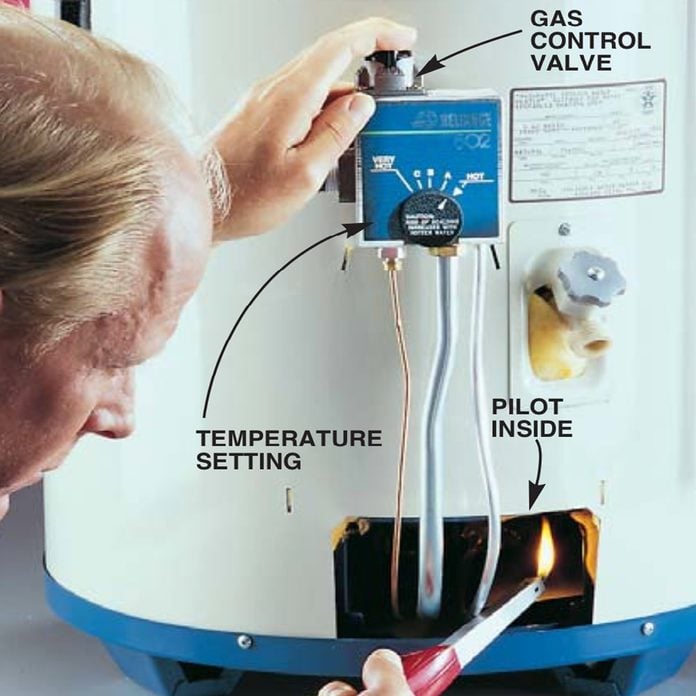
Light the pilot low-cal co-ordinate to the manufacturer's directions. (For electric water heaters, plough the power on at the main panel after the electric inspector checks your work.) Finally, prepare the temperature to 120 degrees F., post-obit the installation instructions. Light the pilot light in the new water heater and adjust the temperature setting.
Installation Details for Electric Water Heaters

First turn off the power to the water heater at your main electrical panel. Then follow the same draining procedures every bit for a gas water heater.
When the water heater is tuckered, disconnect the electric wires from the spiral terminals under the access console, which is usually located nigh the top. (If you don't have electrical experience, hire an electrician to handle all the electrical wiring.)
Follow the manufacturer's instructions for wiring the new water heater. If the new h2o heater is shorter and the onetime wires won't reach, surface-mountain a 4-in. x 4-in. x 1-1/2 in. metallic electric box on the wall or ceiling nearby, run the old wires to the box, and so run a new section of armored cable or electrical conduit to the h2o heater. Check the instructions and make certain the rating of the old fuse or circuit billow is high enough to handle the new water heater. In improver, the circuit should have a shutoff switch within sight of the water heater.
Call your local electrical inspector before you begin the job. You lot'll probably need a permit. Then, when you lot're finished, accept the electrical inspector bank check your work.
Aluminum wiring requires special handling. If you take aluminum wiring, call in a licensed pro who'southward certified to work with information technology. This wiring is dull gray, not the tiresome orange that's characteristic of copper.
Step 12
How to Dispose of a Water Heater
Jeff Gorton, an editor at The Family unit Handyman, volition prove you how to remove and dispose of a water heater in our video tutorial. He will also prove you the easy way to bear a h2o heater out of your habitation, even if you lot are working lone.
These tips will brand your work go faster and easier:
- Measure the height of your sometime water heater and buy a new i the same elevation and so yous don't have to change the length of the water, gas or electrical lines.
- The drain valve (Photo ii) on one-time water heaters often clogs up. If the water drains slowly, be patient. Caution: It'southward scalding hot! TIP: Turn your h2o heater off two hours in advance to let the water to cool.
- Water heaters counterbalance about 150 lbs. You'll demand a stiff helper or a dolly when you lot move the old one out and wheel the new one in. Garbage services typically charge well-nigh $25 to accept the sometime i.
- Before yous start, buy the tools and materials shown here at a plumbing supply or hardware shop or a home middle. Check the sizes of the water supply pipes (near will be three/4 in. like the ones in our photos) and buy the right-size fittings. With everything on hand, you'll need four to half-dozen hours to complete the job (assuming no big hitches!).
- The temperature and pressure relief valve is a rubber device that limits tank pressure and keeps it from exploding (Photo 4). A new i must be included with every installation. For the valve to piece of work properly, the discharge pipe must be kept gratis of obstructions (Fig. A).
- In regions with highly mineralized water, or where required by local codes, use 3/4-in. plastic-lined nipples (most $two each; Photo 5 and Fig. A) for joining dissimilar metals, usually copper tubing to the steel tank. This slows corrosion.
- When connecting the h2o lines, solder the copper fittings before you screw them to the tank and then you don't heat the tank itself while soldering (Photo 5).
- Use "skid" couplings to connect the old and new lines (Photograph 6). Different regular couplings, they don't take an internal stop. You can slide them on, align the copper tubing, then slide them back and eye them over the articulation.
- The new inlets and outlets on the tank don't always line upwards with the erstwhile supply lines. Solder in a pair of 45-degree fittings to offset each line if necessary. Also supersede the sometime shutoff valve with a new ball valve while you're at it (Photo six). Vent diameters are sized according to the heat output of the h2o heater. You might have to increment or decrease the vent size to ensure the all-time draft. CAUTION: If you're unsure if your chimney has a liner, inquire your plumbing inspector.
- Make gas connections with solid steel pipe (Photo eight) or soft copper with flare fittings (Fig. A). Both are more reliable and less expensive than flexible stainless steel connectors, which are not always permitted. Use rigid copper rather than flexible copper water supply lines for the same reasons.
- If y'all locate your h2o heater replacement where leakage could cause harm to the floor or other parts of the firm, fix a pan of an approved size under it (metal for gas water heaters). The pan must have a bleed tube that leads to a house drain or other approved location (outdoors where permitted). The temperature and pressure relief valve belch tube also must atomic number 82 to a drain if leakage would damage the floors. If routing is difficult, discuss options with your local plumbing inspector.
- If you alive in an earthquake-prone region, strap the water heater to the wall with special straps (Fig. A; available at plumbing stores and dwelling house centers). Your plumbing inspector will tell you if they're required.
- Set the new water temperature setting to no more than 120 degrees F. to avert scalding.
Additional Information
- Figure A: Gas water heater details
Further Reading
Water Heater Maintenance: Extend Your Hot Water Heater Lifespan
Fix H2o Heater Leaking
Water Heater Installation
Water Heater Repair: How to Supplant the TPR Valve
DIY Solar Water Heater
How to Repair or Supplant Lacking Water Heater Dip Tubes
How to Affluent a Water Heater
Choosing a New Water Heater
vii Tankless Water Heater Myths You Demand to Stop Believing
The Pros and Cons of Tankless H2o Heaters
Originally Published: November 28, 2022

Source: https://www.familyhandyman.com/project/replacing-a-water-heater/
Posted by: parentfactiven.blogspot.com
0 Response to "How Hard Is It To Install A Hot Water Heater"
Post a Comment